Sailplane Brake Adjustment

The TOST drum brake, used in many gliders, has a well-earned reputation for gentleness. We can make this worse by not knowing how to adjust the cable tension, or by not knowing that the shoes can become glazed and need dressing.
For two decades, I was too busy to do my own maintenance; then retirement struck. Now I had time but no experience. First, the main tire was bald, due to pumice having been used in the runway seal coat long ago. My local mechanics smiled and told me to replace the tire myself because it was too trivial a task to interrupt their busy shop. So I figured out the problem myself.
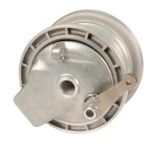
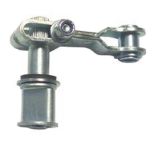
The first thing we notice when wanting to remove the wheel to change the tire is that the brake lever arm must be removed. This is easy – a simple nut – but of course portends that when it’s reassembled, the brake cable tension must be restored. Do we know how to do that? I made some phone calls, but the instructions I received were to pull down hard on the lever arm while fitting it over the fluted bolt. Perhaps you are stronger than I am, but this was not sufficient to hold my glider still on the runway when I started the Solo 2350 engine.
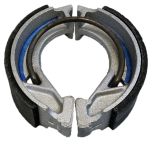
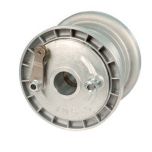
The second thing we notice is that when the axle is removed from the wheel (the tire must first be fully deflated in the Ventus), the wheel drops out of the frame onto the ground and the brake drum falls off. This is not a bad thing, because it gives you a chance to look at the brake shoes.
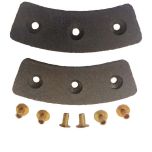
If your drum brake has seemed marginally effective for a long time, the brake shoes have been very likely polished slick and must be addressed. Dressing the shoes and the inside of the drum with some emery paper, perhaps 250 grit, then whisking away the dust, will make the brake much more effective.
So, put a sheet of emery paper in your kit and take it with you to the job.
Now we re-install the wheel, fitting the short pin on the outside of the brake drum into the receiving hole in the landing gear frame and wiggling the wheel into place. Then we re-introduce the axle without expelling the brass bushing at the far end that holds the frame together.
This accomplished, we are now ready to adjust the brake's cable tension.
First, put an 8 mm (as I recall) open-end wrench in your hand and lean into the cockpit. Below the base of the brake lever is the near end of the brake cable. There is a lock nut and a knurled fitting attached to the underside of the control stick. This is just like the bicycle cables you may have worked on at other times.
Release the lock nut, and back the fitting out at least a centimeter to fully loosen the brake cable. If it comes out completely, the brake cable itself will not let the shield fall away, but you'll have to avoid cross-threading it when you screw it back in.
Now lie down on the ground next to the main wheel and install the lever arm. It is still a good idea to put as much tension on the cable as you can before fitting the toothed hole of the lever arm over the fluted bolt-on which it fits. This will be easier with a third hand (ideally someone else who is strong). A long screwdriver will be your friend. Replace the nut.
Now you're ready to fine-tune the cable tension. At the control stick, screw the cable shield's fitting in until you cannot squeeze the caliper handle against the control stick. Ask your third-hand helper to rotate the wheel against the brake to make sure there is some friction. Then tighten the lock nut.
If the glider is already assembled, it's a good idea to have an assistant or two push it back and forth across the ground while you fine-tune the tension at the control stick. Otherwise, take your 8 mm open-end wrench next time you assemble and get help.
Detailed instructions, with illustrations, are at this link: https://wingsandwheels.com/tost-drum-brake-adjustment
Dr. Dan Johnson, Copyright © 2022
Dr Dan Johnson is a retired AME and internist flying gliders for about 30 years, living on the west coast of Wisconsin. Dr Dan Johnson wrote SoaringRx, a monthly column for five years. He’s been speaking and writing on aviation physiology for 30 years. Dr Dan Johnson is also the medical advisor for the Perlan Project.