LX Navigation FLARM Color Display II

LX Navigation FLARM Color Display II

General Description

LX Navigation FLARM Color Display II consists of a high quality color graphic display, microcontroller and a robust plastic case with aluminum back plate. A Flarm compatible 6P telephone type connector is used as a power and data input. To operate the unit there is a multifunctional push button on the front of the unit. The button can execute 5 different commands (left/right, up/down and press (enter)). One bicolor LED (green/red) is used for visual information and a beeper is built in for audio warnings.

LX Navigation Flarm Color Display II

Features

• TP navigation
• SD card
• Readable under any conditions
• Compact plastic housing
• Flarm “radar” display shows complete traffic information
• Shows also ADSB traffic
• Wide spectrum of setup
• User friendly handling via multifunction switch
• Near glider data display (vario, ID..)
• Voice and visual warning information
• Flarm original ID to competition number customization
• Connectable to all types of Flarm devices
• Flarmnet list supported

Setup

LX Navigation Flarm Color Display II

Setup is one of the pages which are available after using the multifunction knob left/right. After the page is reached many options are offered, their selection follows after using the multifunction knob up/down.
• Flarm: – Zoom will define range of the display, – Mute will turn on/off the sound of Flarm warnings
• UNITS: will set units
• SD CARD – LOAD TP (if available!), – SD INIT will initialize SD card (if inserted!), – FORMAT will format SD card (if inserted!)
• WARNINGS: – Volume will set beeper intensity, – Warnings ON/OFF will enable or disable warnings
• DISPLAY: – Orientation allows you to choose orientation of display
• PASSWORD: enables you to enter a password
• GPS INFO: will show current GPS information (if GPS available!)

To get out of menu or submenu press left or right.

SD Card

LX Color LCD has build in SD card slot used for software upgrade, to load TP database and use of Flarm Net database.
• TP database installation: The TP database must be stored in directory on SD card: LX/TP/*.cup (* is name of TP database). If you want to use TP database go to SETUP/SD CARD/ LOAD TP and choose your file and import options (by name or by code). Turn points will become available on your navigation page. If there is no SD card inserted or there is no TP database on SD card, you will only see TP with name HOME on navigation page.
• Flarm Net database installation: If you want to use Flarm Net database it has to be stored on SD card in directory LX/data.fln. The name has to be data.fln or Flarm Net will not work. When other planes are on your Flarm page, the device automatically searches the Flarm Net database for match. If ID is matched the call sign will be displayed in the top left corner.

If no SD card is used the Flarm Net will not work.

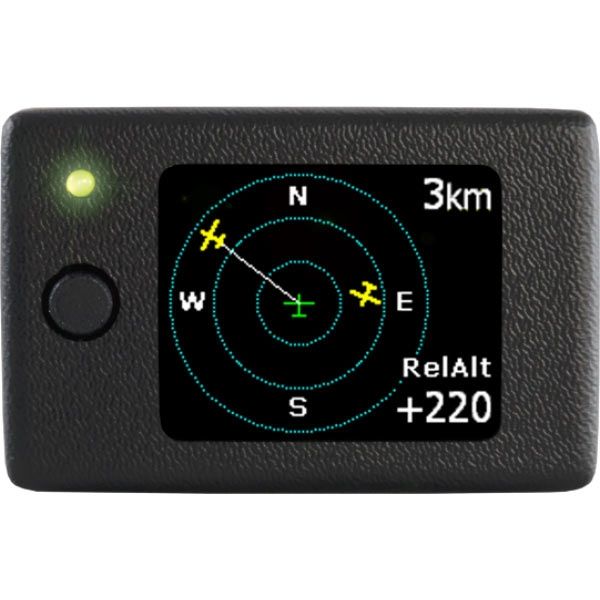
Status Without Collision Warning

During this status a so–called Flarm “radar” screen is active. All detected Flarm–devices are visible on the screen, represented with glider symbols or dots. The symbol depends on the Flarm setting of near gliders (Stealth status). Setup is available without any limitations. The color of LED describes the GPS status of the Flarm unit: if GPS is bad LED is off. If LED is green GPS is detected. The LED is red exclusively during warning status.

LX Navigation Flarm Color Display II

Collision Warning

In case of a collision risk a special so–called “warning screen” becomes active. It is important to point out that the “warning screen” indicates only one glider at a time. More gliders with a warning status may be present! The direction of the impacting glider is marked with a yellow big dot on the display and the LED is red.

LX Navigation Flarm Color Display II

Near Glider Detailed Information

If the pilot has interest to acquire some more detailed information about one of the near gliders, it is necessary to select the glider of interest by using the multifunctional knob up/down key. After selection, the data about relative altitude of the near glider will be displayed.

Selection is visualized with the line which is connecting the center of the display and the glider symbol. If the near glider is also a member of the list of customized gliders, its ID will appear in the upper–left corner. If the near glider is listed in Flarm Net list, the call sign will appear in upper left corner. If custom glider ID and Flarm Net call sign exist, only the custom glider ID will be shown.

LX Navigation Flarm Color Display II

If even more details of near glider are needed, the pilot has to press enter and information will be shown on display (page name Flarm info).

LX Navigation Flarm Color Display II

If the near glider is in the Flarm Net database even more information are shown – call sign, name, registration, and frequency of the pilot (page name Flarmnet info or FN info). Example for FlarmNet info for LX Navigation.

LX Navigation Flarm Color Display II

Flarm ID Customization

The unit is capable to store up to 50 glider completion numbers consisting of up to 3 characters. The ID will be displayed in the upper–left corner of the display when that glider’s Flarm–device is detected. Manual input of a new glider ID is possible when the glider of interest is in the vicinity (meaning: displayed on the screen).

TP Navigation Page

To use TP navigation with existing TP, you must first enable the TP database. How to enable TP database please see chapter 3.1.1 TP database installation.

On this page the pilot will find basic information about navigation and additionally if any TP stored in the external TP database can be selected. In the top left corner the TP name is displayed, followed by the distance. The yellow arrow is a North indicator. In the central upper position steering information is shown. On the bottom of the display there are two navigation boxes that show track and bearing. Navigation is always track up.

TP Functions With SD Card Inserted

Pressing the enter button, allows the selection of any TP stored on the SD card. It is suggested to use the filter (replace stars in the selection with letters or numbers) to reduce the number of points in the selection list. To look for a point of interest, use the Up/Down buttons. After the TP of interest is found, press the enter button and the turn point will be selected. The unit will change over to the navigation page.

LX Navigation Flarm Color Display II

TP Functions With NO SD Card

If no SD card is inserted or there is no TP database detected, TP navigation will still work but only for one TP. The name of this TP is HOME. This TP is automatically generated by the device. After takeoff the device will save GPS coordinates as your HOME TP. The coordinates are saved until the next takeoff.

LX Navigation Flarm Color Display II

Installation

The unit doesn’t require special installation works. Unit dimensions: 62x38x14 mm

Mechanical Installation

On the back side there are two M 2.5 nuts inserted into the case which are designed to be used for fixing. A rectangular hole for 6P telephone type connector passage should also be made.

Electric Installation

In general the unit should be connected to a Flarm unit via the 6P/6P telephone type cable.

Why LX Navigation?

LX Navigation is one of the oldest glider navigation brands. Its founders started experimenting with glider computers way back in the 70's and the Company has been working on improving your flight performance ever since.

Throughout the last 40 years or so it has been working on instruments that most pilots will have used at some time. In fact our equipment can be found in almost any gliding club!

LX Navigation equipment has always been ground–breaking.

LX Navigation motto?

Be the first. Be the best. Be different.

LX Navigation
Write Your Own Review
You're reviewing:LX Navigation LX Flarm Color Display II