LX navigation Era Variometer
General Description
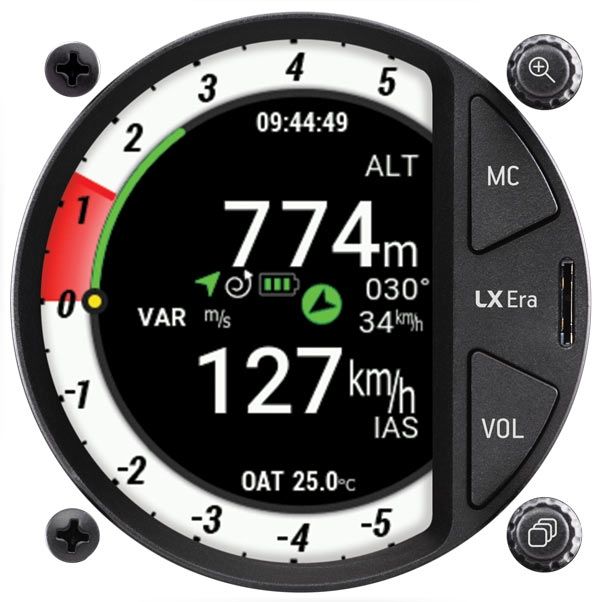
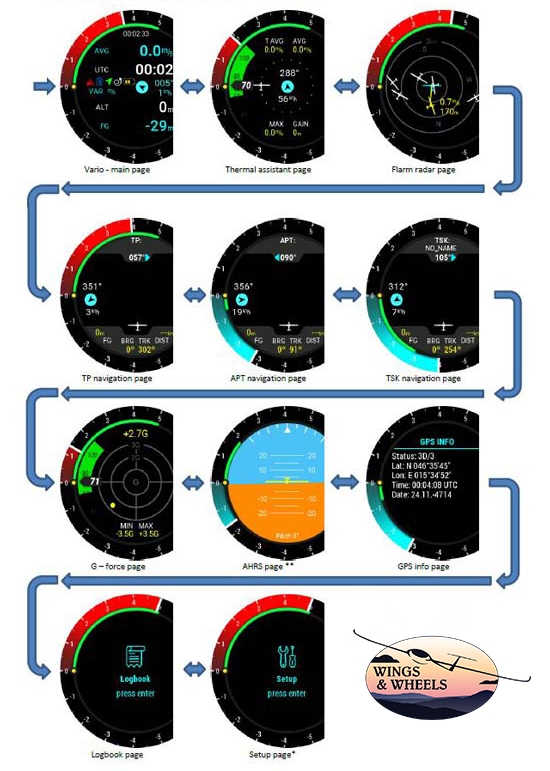
The LX Era is an "all–in one" standalone speed–to–fly variometer, flight recorder, final glide calculator and navigation system with an internal backup battery, audio warnings, vario beeps and voice messages. The unit is capable of providing APT (airport), TP (turnpoint) and TSK (task) navigation on three dedicated navigational pages. Navigation pages feature Navboxes showing bearing to point, track, distance and final glide with airspace shown graphically, airports and turnpoints.
The vario is designed to fit a standard 57mm or 80mm aviation cut–out hole. It is able to supply PDA/PNA units with 5 V/500 mA and 3.3 V/100 mA output on User output connector.
LX Era has built–in high precision digital sensors based on latest MEMS technology for altitude, vario, speed, 3–axis gyro and 3–axis accelerometer sensors. A minimum sampling rate of 100 Hz is applied to all sensors.
The digital needle can be assigned to show one of multiple parameters (vario, netto, g–force, speed command etc.). By default, it is shows vario value.
As an integral part, it has a 2.5" (57mm) or 3.5" (80mm) sunshine readable transflective LCD display to show all user defined data during flight. For accessing all system options, two rotary/push knobs are used. A voice module is also built in for audio warnings.
A double seater installation is possible by installing an LX Era Repeater and connecting it to the system via a CAN bus.
An integral IGC approved flight recorder with ENL level detector will record flight to internal solid–state memory (8GB). All flights can be copied to an external SD card after flight.
For backup and safety reasons, it has an internal battery which will provide power to the Era for three to five hours after the main power supply is disconnected. The integral charger will charge the backup battery when external power supply is connected (12V).
LX Navigation Era is a special order item and may take up to four weeks for delivery.
Why LX Navigation?
LX Navigation is one of the oldest glider navigation brands. Its founders started experimenting with glider computers way back in the 70's and the Company has been working on improving your flight performance ever since.
Throughout the last 40 years or so it has been working on instruments that most pilots will have used at some time. In fact our equipment can be found in almost any gliding club!
LX Navigation equipment has always been ground–breaking.
LX Navigation motto?
Be the first. Be the best. Be different.
Why Era?
Because Era is the latest breakthrough in the world of electronic variometers. The transflective LCD display will show you the way when flying tasks, cross–country flights, or just plain airfield soaring.
With the Wi–Fi/Bluetooth module inside, you are stepping into the age of connectivity. The Era of connectivity, if you will.
Always know your position and heading, with clearly visible lift or sink, thanks to our gradient digital needle.
The ERA is a miniature package that includes everything a glider pilot needs, from navigation, to statistics, AHRS, G–meter, up to the very root of this device – the vario function. All this comes with a backup battery and IGC certified logger. What more do you need?
Features
• Transflective technology sunlight readable display
• Integrated G–meter (g–forces recorder)
• 3–axis gyroscope
• 3–axis accelerometers
• 50ch GPS receiver as an integral part of the system
• Completely new design using latest pressure transducers technology
• Extremely fast vario data acquisition
• Rotary knob with push function, for simple and effective handling
• Nearly unlimited memory space for flight recorder
• ENL (Environment Noise Level) sensor
• 5 user defined status inputs (SC, VP, gear, brakes and ballast)
• OAT probe input (outside air temperature)
• Internal beeper (for Flarm warning)
• Flarm port (input of Flarm data)
• User port for PDA/PNA/Radio/transponder, supplies navigation and Flarm data to PNA/PDA
• Bluetooth interface
• Voice module as an integrated part of the system – CAN Bus, for connection to LX Zeus or other LX devices.
• External SD Card interface, for firmware updates, flight downloads and TP/TSK/APT/Airspace transfers
• Standard 80/57 mm size
• The unit can be used as stand–alone, or as a part of LX Zeus system
• Built–in rechargeable battery provides three to five hours of autonomy
• Internal battery (charged from the instrument power supply)
• Pre–loaded polar database
Functions
• Variometer, TE compensation (TE probe or electronic compensation).
• Seed–to–fly function
• Final glide calculator based on GPS data (for TP and TSK)
• Complete TP/APT/TSK navigation with airspace information and warnings
• High level IGC approved flight recorder
• Flarm radar screen
• Thermal assistant screen
• System extensions: Second seat configuration, Remote control operation (LX Joy)
• Logbook
• Flight information with Barograph
• Multi pilot support
• Accurate wind calculation in straight flight and circling
• Voice alerts
• User warnings
Compare and Decide
| Vario Indicator | |||||
| Size | x95mm |
x52mm |
x52mm |
x52mm |
x52mm |
| Display | |||||
| Battery | |||||
| IGC Flight Recorder | |||||
| MOP Sensor | |||||
| AHRS | |||||
| Bluetooth | |||||
| WiFi | |||||
| AIRPORT Navigation | |||||
| TASK Navigation | |||||
| TURNPOINT Navigation | |||||
| AIRSPACE Support | |||||
| PNA/PDA connectivity | |||||
| FLARM input |
Configurations
LX Era can be used in two different configurations:
• As a standalone: LX Era provides a vario navigation system and has all its options active. The unit will turn on when the enter push/rotary knob is pressed.
• LX Zeus configuration: LX Era serves as the vario system controlled from LX Zeus. The unit will turn on automatically when the main switch (Zeus) is turned on. Flarm radar settings and thermal assistant settings are set on LX Era while all other settings are controlled by settings on the LX Zeus. Some options are disabled on the LX Era (setup, task edit) but all options become active when backup mode is detected.
Technical Data
A large 3.5" (for the Era 80) or 2.5″(for the Era 57) transflective LCD display shows all flight–relevant information to the pilot. The Era boasts a digital needle, which clearly shows current lift, SpeedToFly or other flight parameter. Two push/rotary knobs and two push buttons are used for all pilot to Era communication.
| Dimensions | 62 mm x 62 mm x 63 mm (ERA 57) 82 mm x 82 mm x 63 mm (ERA 80) |
| Mass | 290 grams (ERA 80) |
| Input Voltage Range | 9.0 – 18.0V DC |
| Average Current | 150 milliamps @ 12V DC |
| Wi–Fi / Bluetooth Range | 100 meters / 20 meters |
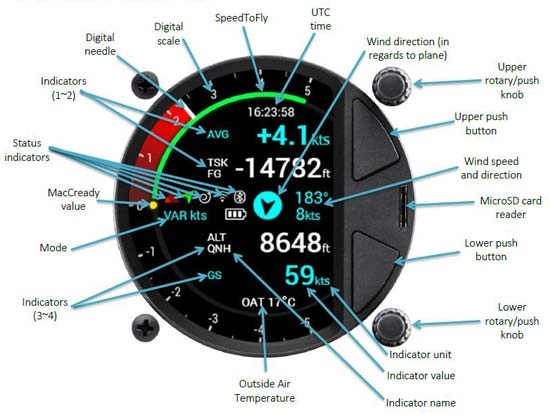
The Era features 6 status indicators described below in their respective order:
• Flarm indicator – appears only when a Flarm device is connected to the Flarm port and communicating with the Era.
• Bluetooth indicator – appears only when a Bluetooth device is connected and communicating with the Era.
• Wi–Fi indicator – appears only when a Wi–Fi device is connected and communicating with the Era.
• GPS indicator – is always displayed, a green arrow indicates good GPS signal, and a red one indicates bad GPS signal.
• Circling/SC mode indicator – indicates whether Era is in Speed Command (SC) or Vario mode.
• Battery status indicator – shows the current state of the glider`s battery. White battery outline indicates it is using the glider`s battery. A red battery outline indicates it is using its built–in battery.
Use of rotary switches
To move around and access all functions of the unit, two rotary knobs with push buttons are used. The upper push/rotary knob serves the function of Cancel and from now on will be referred to as "Cancel". Pressing the upper push/rotary knob will exit from a menu and cancel the settings. Turning the rotary knob in most pages will change the volume.
In situations when you are choosing a value (e.g. QNH and altitude in the initial setup) it will change the value by 10–fold.
The lower push/rotary knob serves the function of Enter and from now on will be referred to as "Enter". Pressing the lower push/rotary knob will enter a menu, or enter a value, or open a hidden menu. Turning the rotary knob will swipe through pages, menus, or change values by 1, depending on the situation.
To change the value of a parameter, enter must be pressed to activate the rotary keyboard (appears on the left).
Use the lower rotary knob to input the desired value and confirm it by pressing enter.
To exit edit mode, fill out all of the fields (when a number is in question) or simply choose the enter sign (⏎). For quick change (multiplication by 10 steps) press enter button and while holding it pressed, rotate the rotary switch.
The upper push knob is used for zooming in on all navigation pages. When choosing a value, it will behave the same as the upper push/rotary knob – it will increase the value by 10–fold.
The lower push knob is used for zooming out on all navigation pages. When choosing a value, it will behave the same as the upper push/rotary knob – it will decrease the value by 10–fold.
Flying with Era
To get the best out of the LX Era, it is important that some preparation is done prior to the flight – trying to configure the instrument or set up a task while flying the glider may spoil your whole day! Pre–flight preparation will ensure that the flight will be both successful and enjoyable.
Flight preparation on ground
• Check if you have desired TP, APT and Airspace database uploaded.
• Prepare a task.
• Check pilot information (this information is written into the flight declaration)
• Check logger settings
Before take off
• Switch the unit ON at least 3 minutes before take–off (this will ensure sufficient GPS reception and will create a base line of the baro trace).
• Select correct pilot (many settings belongs to pilot) on initial setup or create new.
• Check if the task is correct using the Task setup menu.
• During take–off the task will automatically be declared in the flight recorder.
During flight
The LX Era HW and SW concept is optimized so that the pilot doesn’t spend too much time to operating the unit during flight. A helpful that shows that the unit has changed to flying mode is the Logbook page being replaced by the statistics page.
Set QNH
The pilot should input actual QNH value of the airport used for take–off. This action should be carried out on ground, after take–off, change of QNH in Setup/QNH Res menu will adjust altitude reading to actual QNH setting if there is a change.
Wind calculation
LX Era is able to measure wind using two different methods. Wind calculation results are shown on main vario page and on thermal assistant page. LX Era will switch between straight and circling method automatically and history of wind will be counted in new measurements.
Circling:
Wind calculation is based on ground speed (GS) oscillations due to wind influence during circling. The method is active only during circling. The process starts automatically after circling is detected. The calculation is based on fact that the ground speed is affected by wind with GS is at a maximum with a tailwind and minimum with a head wind. This GS difference is used to calculate the wind.
Straight Flight:
During straight flight, wind is calculated using an iterative method that is based on IAS, GS and TRK measurements.
Influence of wind in final glide
The actual wind data (speed and direction) influences the final glide calculation. In task mode, the final glide indication is based on remaining distance over all TP until finish (not over already flown turn points). Wind influence for individual legs is based on current wind data.
Event function
User has the option to set one of the user inputs to Event. If event switch is pressed during flight, it will enable faster record interval in flight recorder (recording in shorter intervals as default for a limited time). Event parameters can be set in Setup/Logger on LX Era unit. The action is accompanied with a clear message.
Task start
A task is started automatically when glider leaves the start TP observation zone. Navigation to the next point will then start. If the pilot wishes to navigate back to starting point, he must simply use “Goto” option in task setup menu. Please refer to Task page chapter.
No task statistics are available on LX Era.
After landing
It is recommended that the instrument be left turned ON for a few minutes after landing. This will ensure that a base line of baro trace is recorded.
10s after the landing is detected, the statistics page will be shown automatically where the 10min countdown will also be shown.
The pilot should wait for 10min before pressing enter to end the flight. The “Calculating Security” message will follow and the logbook page will be displayed. At this point the unit can be switched OFF or the flight downloaded.
Downloading flights
Insert the micro SD card into the external micro SD card holder. Select logbook page and search for a flight that you wish to download. Press enter on that flight and select Copy option. Progress window will inform pilot when the flight has been copied to the external SD card. File format of the flight will be .IGC.

