


LX Navigation Zeus Flight Computer

General Description
LX Navigation offers a wide range of instruments suitable for both club and competition soaring.
Their systems combine two components:
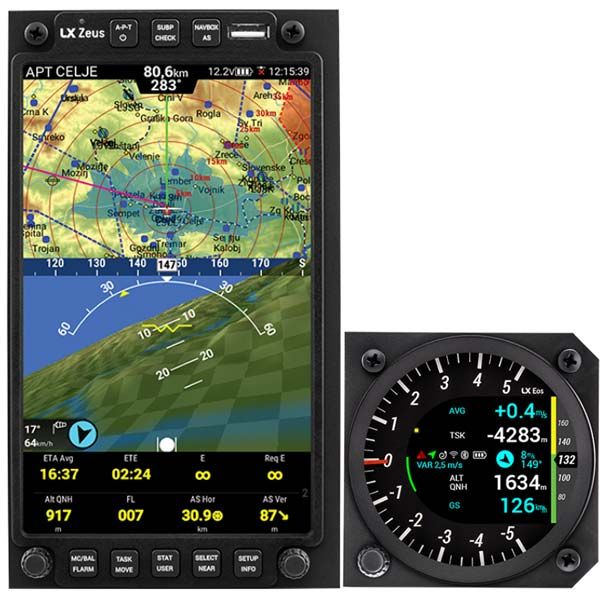
First, a glider computer (LX Zeus) which is used for calculating and displaying all of the key information used by pilots. This glider computer is the brain of the operation.
The second part of the system is a variometer (Eos, Helios, and Era). Its job is to gather the information which the Zeus uses. The vario has pressure connections as well as the GPS antenna connection which is required for IGC logs.
There is a wide variety of choice for varios and for LX Zeus display sizes.
All their varios are standalone devices which can be used without a glider computer for displaying basic flight parameters such as final glide information, Speed Command (SC) as well as simple navigation. Their varios also have an internal battery which means that your IGC logs do not depend on your glider's batteries.
LX Navigation Zeus is a special order item and may take up to four weeks for delivery.
Why LX Navigation?
LX Navigation is one of the oldest glider navigation brands. Its founders started experimenting with glider computers way back in the 70's and the Company has been working on improving your flight performance ever since.
Throughout the last 40 years or so it has been working on instruments that most pilots will have used at some time. In fact their equipment can be found in almost any gliding club!
LX Navigation equipment has always been ground–breaking.
LX Navigation motto?
Be the first. Be the best. Be different.
Why Zeus?
Because Zeus is a top of the line product. Crème de la crème.
Used by pilots from all over the world, our instruments offer the best for both cross country soaring and competitions. The LX Zeus is the latest in this tradition.
Features
•Custom Layout
Design the layout of pages by your own needs and wishes.
•New Turnpoint Helper
When to start turning to enter the sector.
•Start Line Conditions
Time, altitude and ground speed when crossing the line.
•Dynamic Altitude
Chose between two types of final glide calculation.
•Automatic MacCready
User can select between Manual, Last 5 thermals and Day average.
•Detailed Maps
Discover new maps with more and better details than ever.
•User Friendly GUI
Advanced and easy to use interface for the best experience.
Compare and Decide
| Screen Size | ||||
| Size | ||||
| Weight | ||||
| Resolution | ||||
| Brightness | ||||
| CPU | ||||
| RAM | ||||
| Memory | ||||
| USB Port | ||||
| Power Usage | ||||
| Buttons | ||||
| Rotary Knobs | ||||
| FLARM Input | ||||
| CAN BUS | ||||
| Variometer | Era 57/80 |
Era 57/80 |
Era 57/80 |
Era 57/80 |
Display Organization and Management
The available information can be personalized and adjusted to meet the user`s requirements.

Display Organization
• LX Zeus display consists of the following:
• Geographic map.
• Bottom row (NavBox line).
• Header.
• Indicators.
Indicators
Indicators are elements on the display which can be edited (existence, size, position, transparency).

Here is a list of available indicators:
• Header
• Speed indicator
• Sliding speed indicator
• Speed indicator classic (circular)
• Digital speed indicator
• Variometer (bar)
• Variometer classic (needle)
• Wind indicator
• Final glide indicator (selected MC)
• Final glide (sel. MC, terrain aware)
• Final glide indicator (MC 0.0)
• Thermal assistant (available when you are circling)
• Compass
• Compass needle
• Compass assistant (assists the pilot when flying with a compass module)
• Airspace info (information about closest airspace. If no airspace is within selectable limits this indicator is transparent.)
• Limitations (Start conditions)
• Map scale
• AHRS
• Flaps position
• Follow indicator (shows position of a Flarm object being followed)
• Flarm indicator (used to show Flarm collision warnings. If no warning is available this indicator is transparent).
• Best alternate APT info (shows the pilot the best alternate airfield nearby (APT database) besides the one being navigated to). If no APT is available this indicator is transparent.
NavBox Line Customization
The bottom row consists of customizable NavBoxes. This means that the pilot is able to create his own configuration. This simple procedure is also available during flight. The user can set different configurations for TP, APT and TSK navigation. It is possible to copy configurations from one page to another. (Done under Setup>Layout). The procedure starts with a long press on the Zoom rotary knob. After the long press a frame appears around the first NavBox. Rotating the Zoom rotary knob positions the frame. When the desired frame position is reached, a short press of the Zoom rotary knob again will open a list of available NavBoxes.
Setup

The setup menu is available after a short press on the push button labelled SETUP. The menu is divided into two sections (Pilot and System settings). System settings are settings that are valid for the whole system and are not pilot specific settings. Pilot settings may vary from pilot to pilot according to individual requirements. Icons with text will help in finding the menu of interest.
• Use Zoom rotary knob and rotate it to find the menu of interest (selected icon is highlighted)
• Use push function of Zoom rotary knob to enter menu.
Navigation Modes
LX Zeus offers three modes for navigation. These modes are:
• APT: navigation to airports stored in APT memory
• TP: navigation to turnpoints (TP)
• TSK: task navigation after task has been entered. Switch between modes by pressing the A–P–T push button.
Navigation in APT / TP or TSK Mode
There are three navigation pages possible (APT, TP or TASK) and also 2 subpages are possible and all are selectable using the SUBP button.
Sort by Filter
In every selection, the following filters can be used to find the desired airport or turn–point:
• Name (alphabetical sorted from number–A–Z)
• Distance (closest TP will be shown as the first)
• Track (TPs –30 to +30 degrees from current track will be shown sorted by distance)
• Arrival Altitude
Main Graphic Navigation Page

The bottom row consists of NavBoxes. Bottom rows are selectable by pushing button 1–4. All NavBox positions are customizable by following the simple procedure set out below.
Editing NavBox:
• Give a long press on the Zoom rotary knob (blue frame will appear).
• Select the desired NavBox position by moving the blue frame using the Zoom rotary Select position to be edited followed by a short press of the Zoom rotary knob.
• Select the desired NavBox from the list. Confirm selection by pressing the Zoom rotary knob or cancel the procedure by pressing the Volume rotary knob.
• If the row is full, press the 1-4 push button and add to a new empty NavBox container that will appear. Use the same procedure for adding/editing described above.
• To finish the editing process, press Volume rotary knob.
 The second navigation page is divided into two sections. The upper section consists of a vertical profile showing the terrain, glide path distance, airspace, selected TP/APT and cone.
The cone depends on the MacCready (MC) settings. The lower line is a MC setting of 0.0 and upper the line represents the selected MC value. If the glider icon is between the upper and lower lines it means that it is still below glide path for the selected MC, but that it could still reach its destination if a lower MC setting was set. If the glider is below the lower line it is too low and it will not reach the intended destination.
The lower section shows additional APT / TP data such as:
• Grass or asphalt runway with directions
• Elevation
• QNH alt
• Flight level
• QFE alt
• Frequency of the APT
• Your current radial
• Your current distance from selected APT / TP
The lower section in TSK mode shows a circling log page, wind profile page and a statistics page. Use the 1–4 button to switch between information pages on this subpage.
Third Navigation Page (2nd Subpage)
 The third navigation page shows terrain data that is split between a map and an AHRS (artificial horizon and reference system). If the LX AHRS is not connected to the LX Zeus system, only the terrain profile is shown.
 The pilot can select full or half screen for 3D view with AHRS.
Note: This 2nd subpage can be disabled under Setup>User Interface.
Flying With LX Zeus
It is recommended that the unit is set up for every flight before take-off to ensure a stress–free and enjoyable flight. This is especially important before any contest, record attempt or badge flight.
Flight preparation on the ground
It is suggested that the following be checked:
• Database status
• Prepare task (use new or edit options, or select imported task)
• Selected pilot profile with important settings
Before take off
• Switch the unit ON at least 3 minutes before take–off (this will ensure sufficient GPS reception and will create a base line for the baro trace)
• Select correct pilot (there will be many settings specific to each pilot)
• Check whether the task entered is correct by using Task edit
• Declaration: A task selected and active before take–off will be declared automatically to connected flight recorders (LX Eos/Era, Colibri II and/or Flarm)
• Switch on second seat unit if in a double seater